Leg Vise – part 3

Last night was all about through mortices. I flipped the bench on its back (the weight of the vise combined with the offset leg made this a challenge) and marked out the half inch by 2 and 7/8 through mortice on the leg.  Aparently the legs had case hardened in the past few couple of months and my marking knife chipped the surface even when going with the grain.  Then I drilled out most of the waste and copped/ pared out the rest.


After flipping the bench back upright i bolted the chop to the bench and clamped it in place to mark the mortice location.  I marked both sides of the chop and pared it down to ensure clean edges.  Then I drilled and chopped out the waste and almost finished before my wife told me it was 10 o’clock and I called it a night.

I also adjusted the chop on my end vise and it finally closes properly.  Once I clean up the motive the next step will be attaching leather to the faces of both vises.

Leg Vise – Part 2

Tonight after the kiddo was put to bed I headed down to the garage, pulled the chop out of its clamps, and proceeded to battle the end grain in my shooting board.  My #7 is going to need resharpening after the battle with the hard maple and I ended up resorting to my Japanese saw rasp but the end is fairly square with the sides.

After planning both sides until everything was relatively flat I clamped the chop to the leg and marked the screw whole position from the back using the auger bit.


My #6 and #7 then made short work of the tapered easement of the top and I sawed a 45 degree angle where the chop sides meet the body.

  
Then I used the chamfer shave to ease all of the edges before testing the fit in its final location.  It looks like I will eventually need a longer acme rod but at the moment it should work for my needs.  I also still need to to chop the mortises for the parallel guide but it’s getting there.

Leg Vise – part 1

Last week was campus recruiting season (I interviewed 16 candidates) so very little woodworking got done but this weekend I finally started flattening the boards for the table top.  I soon realized that edge jointing such long boards without a face vise was quite difficult so I decided to delay the table again a build the leg vise for my bench.

I had already ripped down the components so it only required some final milling but since this is hard maple some sharpening was required.


Once the glue has cured for 24 hours it will be time for the shooting board and some final shaping.

Trestle Table – laying out the top

Over the weekend I finished the rough milling of the boards for the top. 4 boards ended up needing to be ripped to remove knots, sap wood, or cracks so the overall width of the table top is looking like it will be closer to 35 inches instead of the targeted 36.

After identifying the best face of each board and figuring out the best layout of board widths here is the final result.  There is more color variation across the boards than I would have liked but

Now I can start flattening the the show faces and jointing the edges.  Hopefully I can get the top glued up before next week so I can figure out the final dimensions for the base.

Trestle Dining Table – Rough Milling

This last week I finally started on the next major project; a (much requested) new dinning table.  We are currently using the small square table that came with our old condo.  It is a 28×28 table done in the Chinese style (I assume it was built in Hong Kong along with the other pieces in the same wood type) and while I am a big fan of this style of furniture, a frame and panel table top really does not make sense for a dinning table, especially with small kids.  Not to mention the fact that it is really too small for 4 people to eat a meal at.

The plan is to build a version of Chris Schwarz’s American Trestle Table with a slightly wider top (one of his comments in a blog post mentioned that 36 inches would not be a problem with the design). So after setting up some saw horses and planks in the dinning room to confirm that the dimensions work it was time to pick wood for the top.

After digging through my pile of rough Douglas Fir I decided that there are enough clear boards to make the top though a few will need some long rips to remove edge knots or sap wood.  I am not sure how well an inch thick Douglas Fir top will hold up but I can always replace it with a hardwood top at a later date (after the kids are older).  I rough cut the selected boards down to 80 inches long , making sure to cut a couple of inches off of the end before measuring. While 80 inches is the target length of the table there will be bread board ends that will add some length.

Over the weekend I used a combination of by #6 (which has a cambered blade) and my #7 to flatten the surface enough to get an idea of the grain pattern and direction.  It looks like one more board (three total) will need to be ripped down to remove a split and one has a knot I missed in the initial inspection that does not appear to be a problem on one side.  Later this week (or more likely next weekend) I will set up my mini band saw and rip them down.

Milling: the act of taking a pile of lumber and turning it into a slightly smaller pile of lumber.

IMG_0954 IMG_0956 IMG_0961 IMG_0960

Wooden Smothing Plane – H.G. Stilley

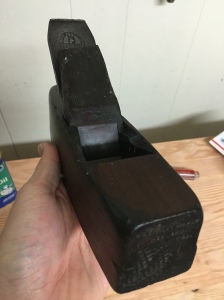
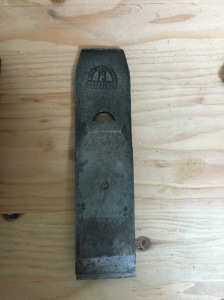
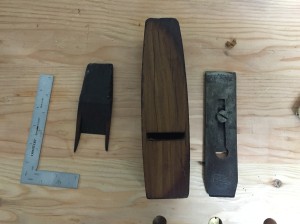
Some of you may remember the rotten tool chest I found on the side of the road a few weeks back and the smoothing plane I found inside.  Well this week my elbow was giving me some trouble so rather than milling up the maple for my leg vise I decided to get it up and running.  Here is the starting point:

IMG_0873

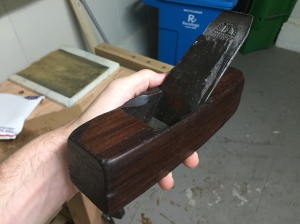
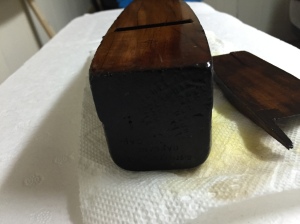
After taking everything apart it looked like the components were mostly intact so I started following the process the Slightly Confused Woodworker used on his English plane but instead of using a plane to flatten the sole I used heavy grit sandpaper glued to a marble slab (I encountered some serious tear-out when I tried to use my sharpest plane).  The sole needed a fair bit of flattening.

IMG_0921

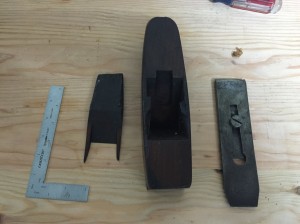
The blade and cap iron got a bath in my electrolysis setup and came out looking pretty nice.  A previous owner had take the time to flatten the back of the blade so it really only needed polishing, but the chipped edge was going to require some grinding.

IMG_0920IMG_0929

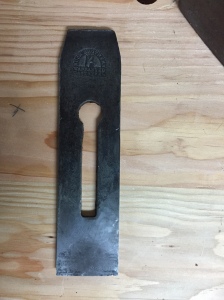
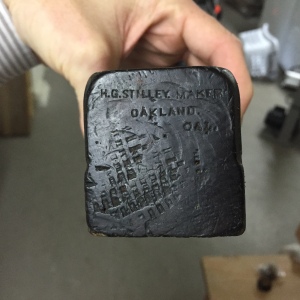
While I was waiting for the BLO to cure, I decided to look up the maker H.G. Stilley since he was a local.  There was little online other than he moved to San Francisco during the gold rush and that his planes were rare. I also found an old posting from a collector near Carmel, California looking for any planes made by this maker so I emailed him a picture to see if he had any info.

What I was able to find online:

  • Born in Delaware
  • Moved to SF during the gold rush and at one point lived a few blocks from my office
  • Census records show him living in SF, Oakland, and the gold fields
  • Was a member of the Yerba Buena society of Odd People (S.F. has always bee a bit different, look up Emperor Norton sometime)
  • Lived to the age of 85

IMG_0924 IMG_0923

After asking me a few questions he ended up offering some money for the plane so he could add it to his collection so unfortunately I will not get to finish the restoration and actually get to use it, but it will be going to someone who appreciates it.

IMG_0926 IMG_0928

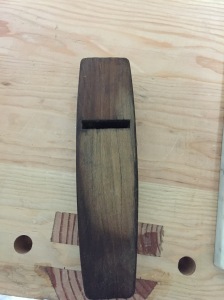
It still needs a coat of wax and to be sharpened but it looks pretty go to me.

IMG_0930 IMG_0931