This weekend I finally finished the raised planter. It took a while but I finally got that hang of these joints.


After a few coats of deck stain all that remains is a bit of irrigation and then planting.

I can finally get back to the bench.
This weekend I finally finished the raised planter. It took a while but I finally got that hang of these joints.
After a few coats of deck stain all that remains is a bit of irrigation and then planting.
I can finally get back to the bench.
After a week at the Jersey Shore (south jersey so no Snookie – I hate the fact I know that reference) I tried to get caught up on the planter but between jet lag and what appears to be bug I’ve picked up progress in as slow. Working with heavy timbers wears you out so test fitting joints is tough. I have even more respect for timber framers.
Unfortunately, my circular saw blade is not large enough to cut all the way through so each cut requires followup hand work. This is made even worse by the interlocking grain and curly figure in the wood so I can’t pop out large chucks with my large chisel.


Making matters even worse, my foot long 1/4″ drill bit snapped about half way through so the last screws had to be driven in without pilot holes. Luckily I started adding paraffin wax so I only snapped one screw.


The goal was to get one tier installed so I could finish leveling the yard (this tier will be partially buried). Since I have no idea when I will be installing the next two levels, I went ahead and applied deck stain to these to protect them from UV exposure. I went with DEFY Extreme water based wood stain in color Cedar which is supposed to be the best deck stain that is legal in California. Overall I like the color though it does muddy up the grain (something all semi transparent deck stains would do). I will say the timber that spent the week outside getting wet and dirty looks the best so maybe the other boards will darken as they age.
I had trouble finding a sample online for how the DEFY Extreme Cedar would look on Eucalyptus (eucalyptus globulus aka Tanzanian Blue Gum) so hopefully if anyone else out there is curious this will help them out.
Well I’m sure I will regret this decision in a few years when it rots out but I decided to put a layer of pressure treated lumber between the base timbers and the upper layers. This will give me an extra inch and a half of height and it will provide support for the first step timber.

I probably should have ordered another set of timbers for the layer but I’m loosing the next two weekends so I don’t have the time for another sawmill trip. Plus I had the lumber sitting around (it was used as border edging in the yard) and I don’t want to spend the extra money as we are already over budget.
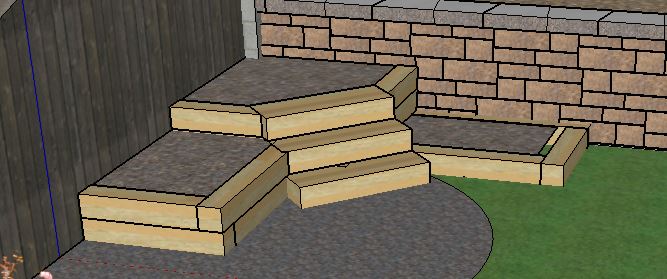
The days are getting shorter so the after work progress has slowed dramatically (Monday night I was working by the light of my iPhone’s flashlight) but progress is being made. They base tier of the raised planter has been installed and I have started to lay the second.


A base of gravel was laid down and then the timbers were pounded until level and at the same height. Then 3 foot long re-bar was pounded into the sand to try and hold things in place. Cutting the timber takes 8 cuts with my circular saw (one shallow cut on each side with the speed square and then 1 deep cut on each side free hand) followed by hand sawing to finish the cut. That is my root saw in the picture so don’t worry about the rust as its getting recycled after this project.
I am using 8 inch timber screws to hold the tiers together. Pre-drilling involved using a 1/2″ auger bit in a brace to create a countersink and I then used a corded power drill with a 12″ long 1/4″ bit to drill a hole for the screw shaft. Once the timber was in position I bounded the screws through the holes until they made contact with the lower timber and then cranked them home with a hex driver in my brace (I tried using an impact driver and it was slower and nosier).
Unfortunately, It appears I delved to deep when I created the base tier. I had designed the base timbers to be in line with the base of the wall however, after using some lasers to measure the height differences is appears the top of the base for the upper wall is 3 or 4 inches lower than the top of lower wall. Once you add in additional dirt height at the back of the yard for drainage slope my second tier will end up being mostly under ground so I either need to buy another tiers worth of timbers or come up with another solution.
I have moved my yard renovation project to its own dedicated blog since I doubt anyone interested in woodworking wants to see me move dirt around but my long dry spell for woodworking is getting a temporary reprieve with the construction of a timber raised planting bed. During construction of the walls and leveling the yard I discovered that the difference in yard height between the two properties was higher than expected and I encountered a concrete footing that interfered with the wall’s foundation. The solution to both of these problems was the addition of a raised planter bed made of timbers.
Last weekend I picked up 1,500lbs of eucalyptus landscaping timbers from my usual green waste saw mill. They were a bit wetter than I was hoping but I hate the look of pressure treated lumber so this was the best option. Those step pieces are 6″ x 12″ x 3′ and weigh ~100lbs each.

The surface saw marks were a bit rougher than I was hoping and the attempt to run them through my thickness planer was comedic at best. Normally I would have just used by #6 plane to take down the rough bits but between my shot timeline and my physical limitations (I am doing heavy labor every weekend and every night after work) I decided to get an electric hand planer. I picked up the Porter Cable one from Amazon and it arrived last night (the irony is I turned down a free Makita one that my dad offered me last year).


After moving dirt around until dark (around 8:30) I moved to the garage and fired up the new tool. The planer made short work of the saw marks (green eucalyptus it soft stuff, not so much when dry) and I was able to “smooth” 4 of the three foot long timbers before stopping around 9. All in all I think it was a good decision though I do wish I had time to let the timbers sit around for a few month before installing/staining them.
